 Skip to the content

When it comes to off-road riding, ensuring optimal brake response is crucial for both safety and performance. A well-functioning brake system can mean the difference between a smooth ride and a potential accident. Fortunately, with a few simple adjustments, you can significantly enhance the braking capabilities of your ATV.
Many ATV enthusiasts overlook the importance of regular maintenance and adjustment of their brake systems. Small issues, such as worn pads or misaligned components, can lead to diminished braking power. By making these necessary fixes, you not only improve your overall riding experience but also extend the lifespan of your ATV’s brake system.
In this article, we will explore straightforward techniques to adjust your ATV brakes, ensuring that you have the confidence to tackle challenging terrains. Whether you’re a seasoned rider or a newcomer, understanding how to optimize your brakes can enhance your safety and riding enjoyment.
Understanding Brake Components for Enhanced Performance
The efficiency of your ATV’s braking system is crucial for both performance and safety. To optimize brake response, it’s essential to understand the individual components that comprise the braking system. Each component interacts to effectively slow or stop your vehicle when needed.
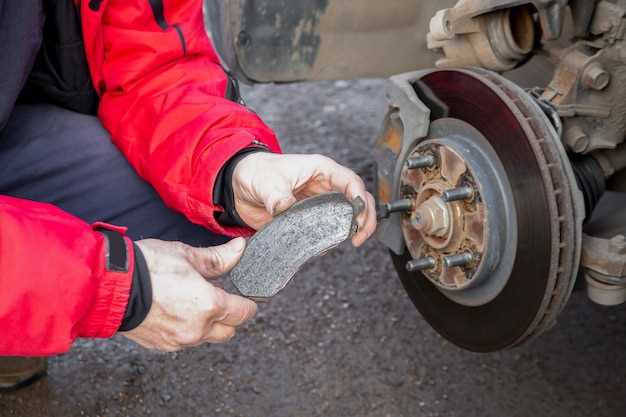
Key parts of the braking system include the brake pads, rotors, calipers, and brake fluid. Brake pads provide the friction necessary to halt the motion of the vehicle. With regular use, pads wear down and may need replacement to maintain optimal performance. Checking the thickness of the pads can help you identify when it’s time to fix or replace them.
Rotors, or discs, play a critical role in the braking process by providing a surface for the brake pads to clamp down on. Warped or uneven rotors can lead to a compromised braking feel, resulting in longer stopping distances. Regular inspection and milling can help ensure they remain flat and reliable.
Calipers house the brake pads and use hydraulic force to push them against the rotors. It’s vital to keep the calipers in good working condition. A seized caliper can cause uneven wear on the brake pads and lead to decreased stopping power. Checking for leaks in the hydraulic system and ensuring the calipers move freely can enhance braking response.
Lastly, brake fluid is essential for providing the necessary pressure to activate the calipers. Old or contaminated fluid can trap air in the lines, diminishing performance. Regularly flushing and replacing the brake fluid can help maintain the system’s integrity and responsiveness.
By understanding and maintaining these critical components, you can significantly enhance your ATV’s brake performance, ensuring a safe and efficient ride. Regular checks and timely fixes will contribute to a more responsive braking system, allowing you to enjoy your adventures with confidence.
Step-by-Step Guide to Adjusting ATV Brake Levers
Adjusting your ATV brake levers is essential for ensuring optimal safety and performance. A proper adjustment can enhance your control and response during operation. Follow this comprehensive guide to fix any issues with your brake lever configuration.
Step 1: Gather Tools
Before you begin the adjustment process, gather the necessary tools. You will typically need a socket wrench, screwdriver, and possibly pliers. Having these items on hand will streamline the adjustment process.
Step 2: Inspect the Brake Lever
Start by examining the brake lever for any signs of wear, damage, or misalignment. Ensure that it operates smoothly without any sticking. If the lever feels loose or inconsistent, it likely requires adjustment.
Step 3: Locate Adjustment Mechanism
Most ATV models come with an adjustment mechanism located near the brake lever. This can be a screw or a knob that adjusts the lever’s position closer or farther from the handlebar. Identify this component to proceed with the adjustment.
Step 4: Make the Adjustment
Using your screwdriver or wrench, carefully turn the adjustment mechanism. If you want the lever closer to the handlebar for easier reach, turn clockwise. To position it further away for a more extended reach, turn counterclockwise. Press the brake lever a few times to test the new setting.
Step 5: Test the Brake System
After making your adjustments, it’s crucial to test the brake system before heading out. Bring your ATV to a safe, open area and perform several brake tests at low speed. Ensure that the lever engages smoothly and the brakes respond effectively.
Step 6: Fine-Tuning
If the brake response is still not satisfactory, revisit the adjustment screw. You may need to make slight tweaks to achieve the perfect position. Repeat the testing process until you feel confident in the adjustment.
Step 7: Regular Maintenance
Lastly, remember that regular maintenance is key to safety. Periodically check your brake levers to ensure they are functioning properly. Making small adjustments as needed will help maintain optimal brake response over time.
Common Safety Fixes for ATV Brake Issues

Ensuring optimal brake performance on your ATV is crucial for safety and control. Many common issues can arise that affect brake response, but they can often be resolved with simple adjustments and fixes. Here are key areas to focus on:
- Brake Fluid Level:
Check the brake fluid level regularly. Low fluid can lead to decreased braking performance. If it’s low, inspect for leaks and refill with the appropriate brake fluid.
- Brake Pad Condition:
Inspect brake pads for wear. Worn pads should be replaced immediately to ensure efficient braking. Replace them at the first sign of thinning.
- Brake Line Inspection:
Examine brake lines for any signs of damage or leaks. A compromised line can lead to brake failure. Replace any damaged lines for safer operation.
- Adjustment of Brake Cable:
For ATVs with mechanical brakes, ensure that the brake cable is properly adjusted. A loose cable can cause delayed engagement, while a too-tight cable can hinder performance. Make precise adjustments to achieve a satisfactory response.
- Clean Brake Components:
Dirt and debris can accumulate in the brake system. Regularly clean your brake components to prevent contamination that can affect performance.
- Check for Proper Alignment:
Misalignment of brake components can lead to uneven wear and ineffective braking. Ensure that all parts are correctly aligned and make necessary adjustments.
- Test Brake Response:
After any adjustments or fixes, always test the brakes in a safe environment. Ensure they engage promptly and effectively before taking your ATV into more challenging terrain.
Regular maintenance and attention to these areas can significantly enhance the safety and performance of your ATV brakes. Take the time to address these common issues, and you’ll enjoy a more responsive and effective braking system.